When you try to connect to SQL Azure and get an error like the one below, your IP address is not configured access to the server.
Cannot connect to xxxx.database.windows.net.
Cannot open server 'xxxx' requested by the login. Client with IP address '192.168.1.1' is not allowed to access the server. To enable access, use the SQL Azure Portal or run sp_set_firewall_rule on the master database to create a firewall rule for this IP address or address range. It may take up to five minutes for this change to take effect.
You need to add your IP Address to the firewall rules of the SQL Azure to get yourself connected. There are two ways to do this. One using the UI and the other using the stored procedure - sp_set_firewall_rule.
Cannot connect to xxxx.database.windows.net.
Cannot open server 'xxxx' requested by the login. Client with IP address '192.168.1.1' is not allowed to access the server. To enable access, use the SQL Azure Portal or run sp_set_firewall_rule on the master database to create a firewall rule for this IP address or address range. It may take up to five minutes for this change to take effect.
Login failed for user 'azureuser'.
This session has been assigned a tracing ID of '41c2afa1-0097-4db8-b17a-c7bbef547287'. Provide this tracing ID to customer support when you need assistance. (Microsoft SQL Server, Error: 40615)
For help, click:go.microsoft.com/fwlink?ProdName=Microsoft+SQL+Server&EvtSrc=MSSQLServer&EvtID=40615&LinkId=20476
You need to add your IP Address to the firewall rules of the SQL Azure to get yourself connected. There are two ways to do this. One using the UI and the other using the stored procedure - sp_set_firewall_rule.
- Login to the Azure management portal https://windows.azure.com by providing your Live ID credentialsClick on Database
- On the main area, click on the "Firewall Rules" box.
- Click on "Add"
- Provide a name. (For example - "To Allow Me, The Azure Pro")
- Provide your IP Address in the start and end boxes. (Your current IP Address is displayed at this dialog box at the bottom. You might also like to provide an address range. For example from 192.168.1.0 to 192.168.1.255)
- You are done! Start connecting now.
- After step #3 above, expand the server to see the databases
- Select MASTER and clik on MANAGE on the ribbon above
- Database Manager for SQL Azure opens up in a new window (https://manage-sgp.sql.azure.com/)
- Provide the credentials for the Database (normally a different one)
- Once you are in, click on "New Query" on the toolbar/ribbon
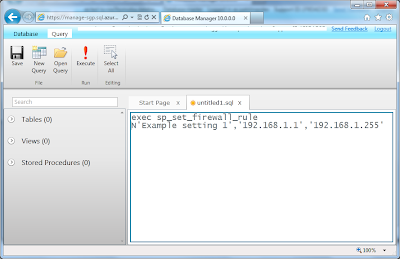
- Execure the SP: exec sp_set_firewall_rule N'Example setting','YOU IP ADDRESS', 'YOUR IP ADDRESS' (You might also like to provide an address range. For example from 192.168.1.0 to 192.168.1.255)
- Your done!
Hope this helped!


